SashWeaver
  • Home
  • About the artist
    • Gallery
  • Store
  • Sprang
  • Fingerweaving
  • Virtual Class Room
  • Contact me
  • Blog

Blog

Mrs. Luther's Bonnet (SPRANG BONNETS PART 2)

2/6/2023

0 Comments

 
PART 1 OF THE SPRANG BONNETS starts HERE
Picture
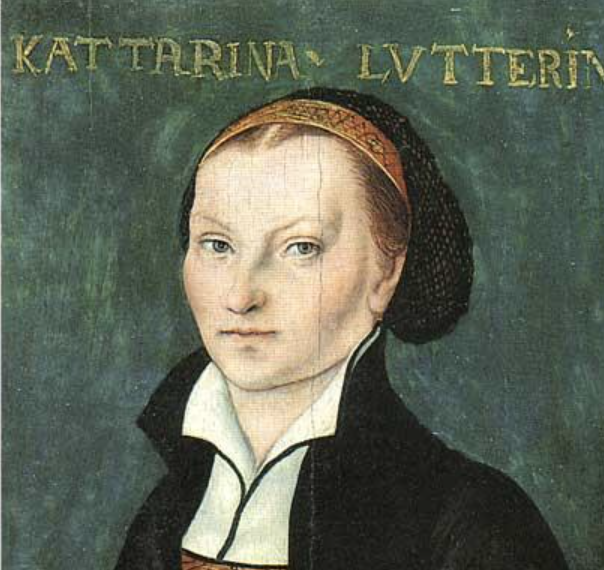
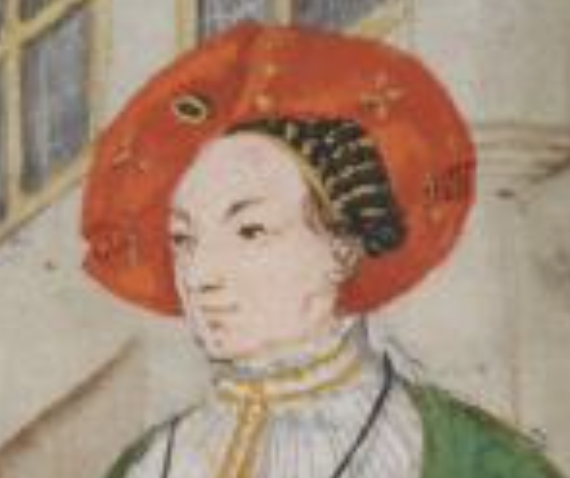
The portrait by Lucas Cranach, painted in 1526, of Katharina Luther, wife of the famous Martin Luther, depicts a woman wearing a hairnet. It was Dagmar Drinkler of the Bavarian National Museum who showed me this image some years ago. It is her opinion that Mrs. Martin Luther is wearing a sprang bonnet. I interpret this as possibly an interlinking structure, what I call a doubles grid.
Picture
Bonnet, interlinking stitch, doubles grid with a narrow band attached.
Picture
The narrow band wraps around the head to secure the bonnet to the head, and is tied at the back of the neck.
This is the plan I followed: I made a wide rectangle of sprang cloth, securing the centre with a chain-across technique. I gathered the loops from one end of the cloth into a tight ring. This ring will be located at the back of the head. I then folded the cloth and joined the selvedges together in a seam. The loops from the other end of the cloth go around the face.
Picture
drawings by Carol James
Picture
To make this bonnet I selected a 2-8 wool, and set on a warp that measured 15 inches long, and 124 loops (248 threads). I worked a doubles grid stitch.
Picture
Picture
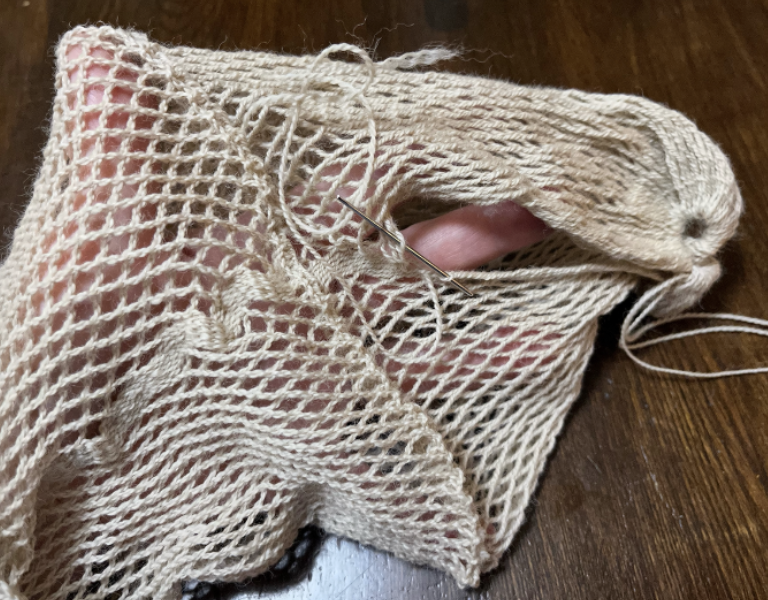
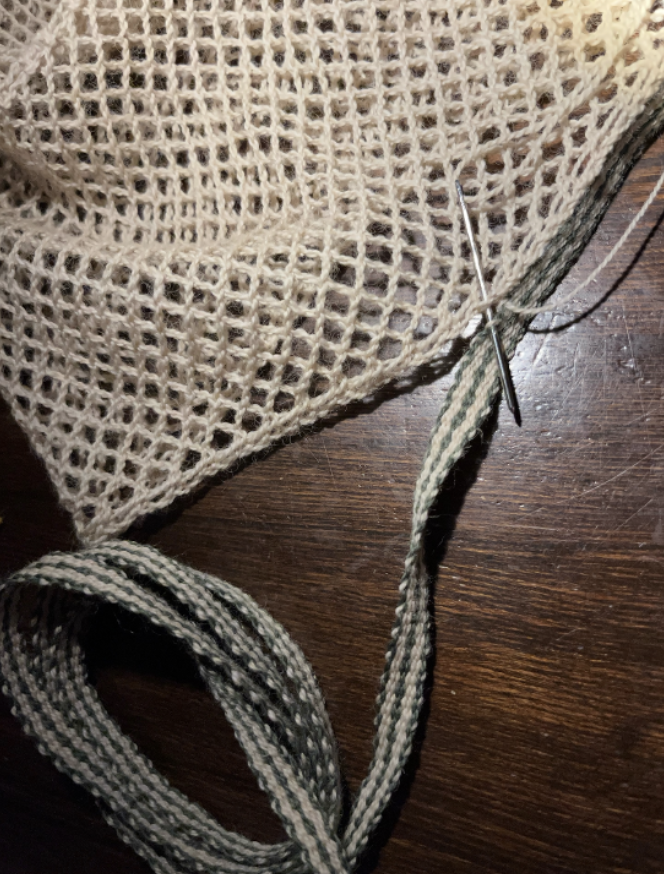
Arriving at the centre, I chained across to secure the cloth. I chained threads one at a time.
Picture
Here you see one set of loops cinched together into a ring. You also see how I sew the rectangle into a tube, stitching the selvedges to each other.
Picture
It did not look like a bonnet at this point.
​It looked like a tight tube.
Picture
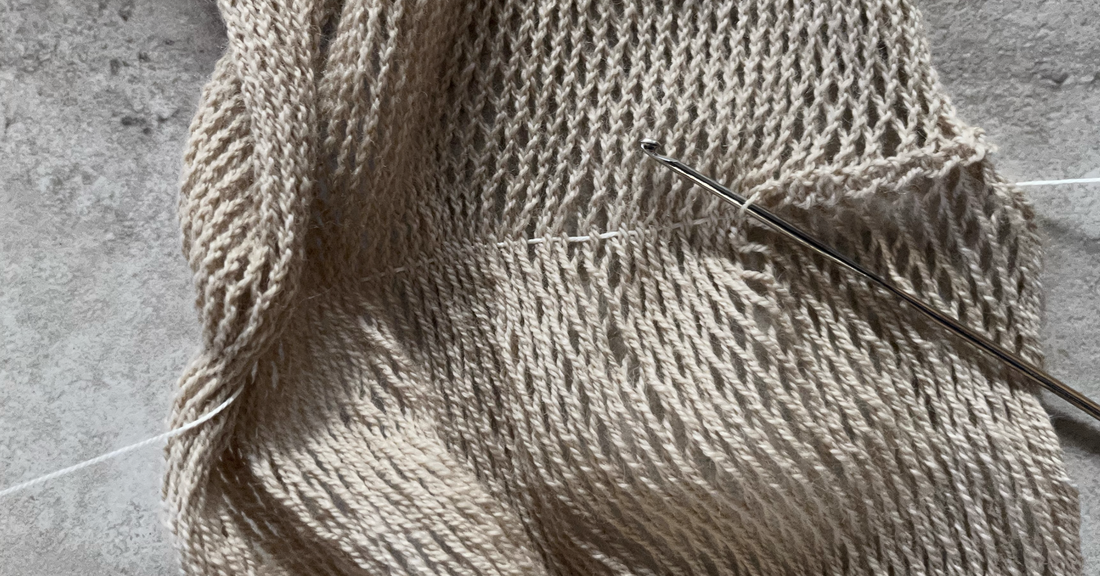
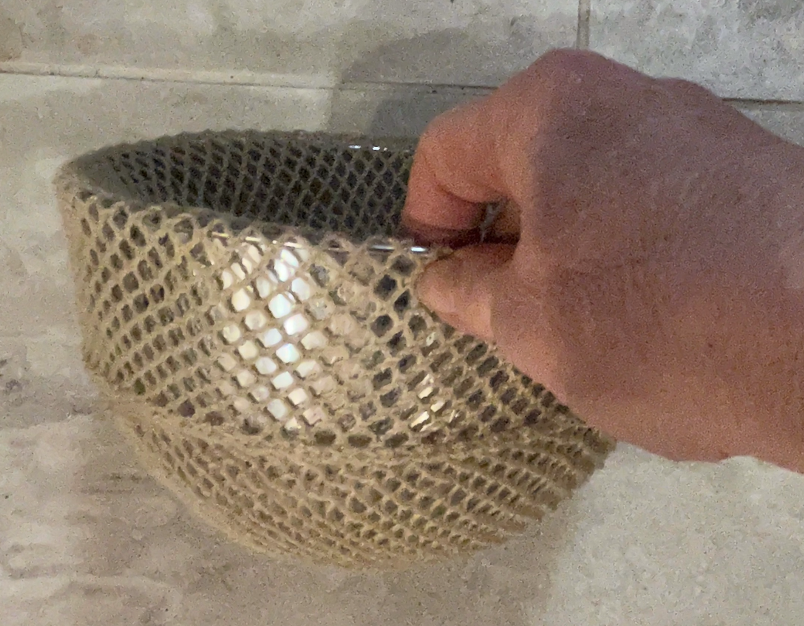
Then I blocked it. I got it soaking wet, and then selected the right sized mixing bowl from my kitchen.
I stretched the wet bonnet around the bowl and left the bonnet to dry.
Then blocking process transformed the piece from that tight tube into something that looked far more bonnet-like.
Picture
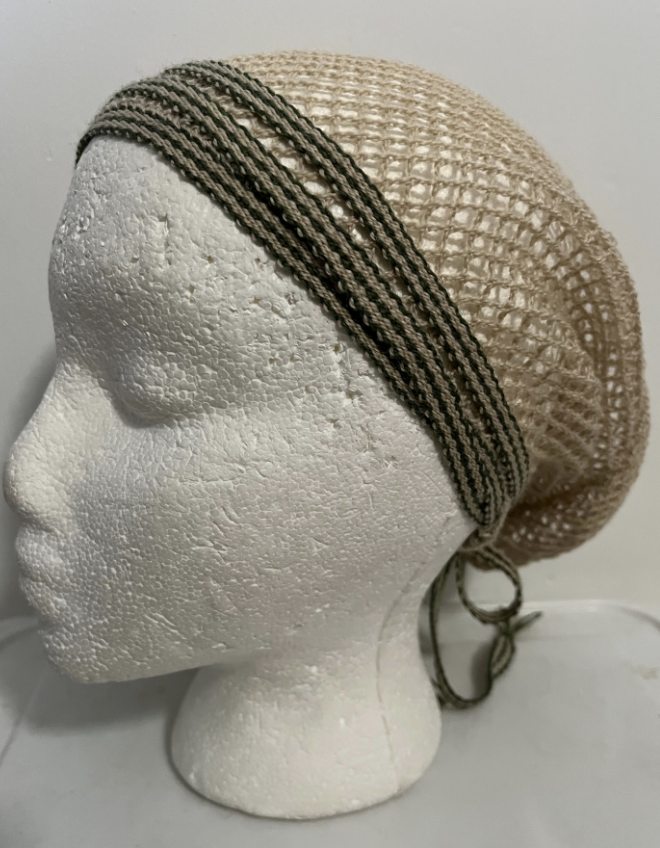
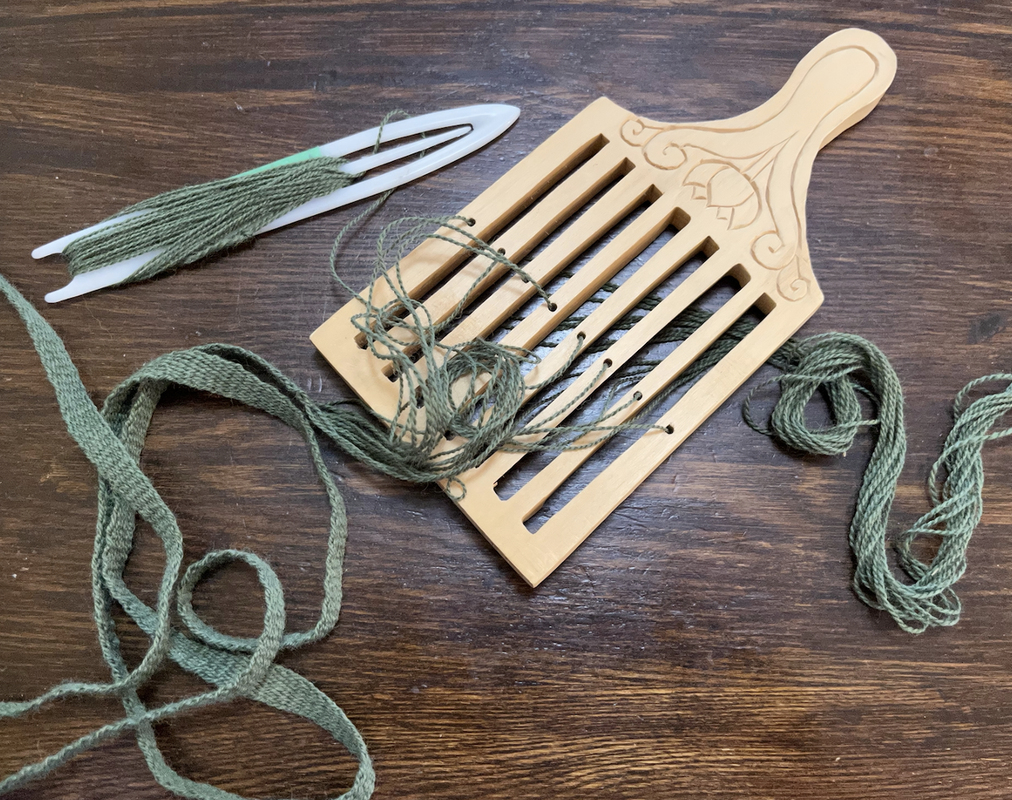
Mrs Luther's bonnet seems to have a band around the rim. I made a band using my tape loom. I measured out threads of sufficient length to make a band that will go around my head three times, plus a bit extra to tie a knot.
Picture
sewing the band to the front 3/4 of the bonnet
Picture
the ends of the band pass through the lacy holes at the back of the head
I sewed the band to the edge of the bonnet. I sewed the band to the front 3/4 of the bonnet, leaving the back 1/4 of the bonnet with no sewn-on band. I pulled the ends of the band through the loops at the back of the bonnet. In this manner the band can be pulled tight to secure the bonnet to the head.
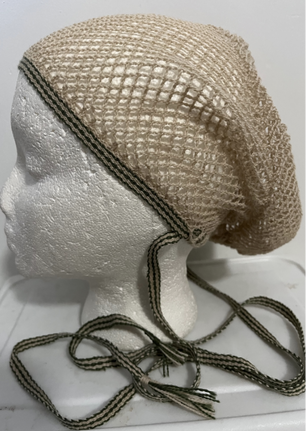
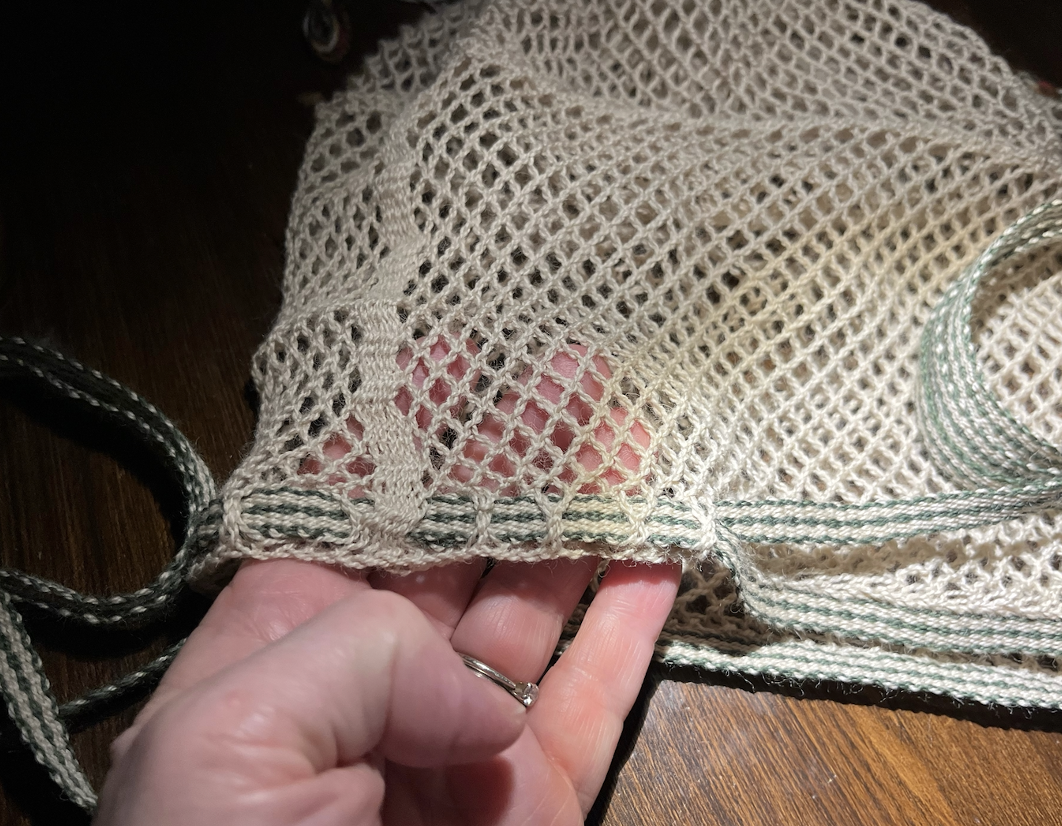
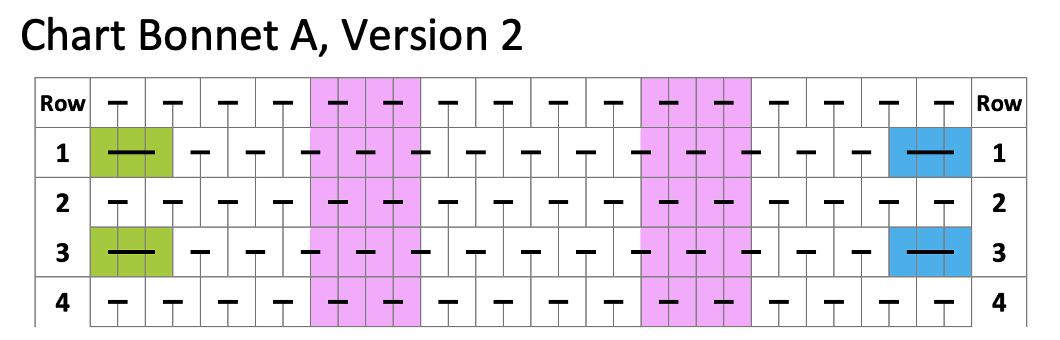
I made this first bonnet using a pale wool, hoping you would be better able to see the details of construction. Mrs Luther is wearing a dark colored bonnet. You will also note that the band around the head is rather wide, far wider than the band I made for this pale-coloured bonnet.
Picture
Picture
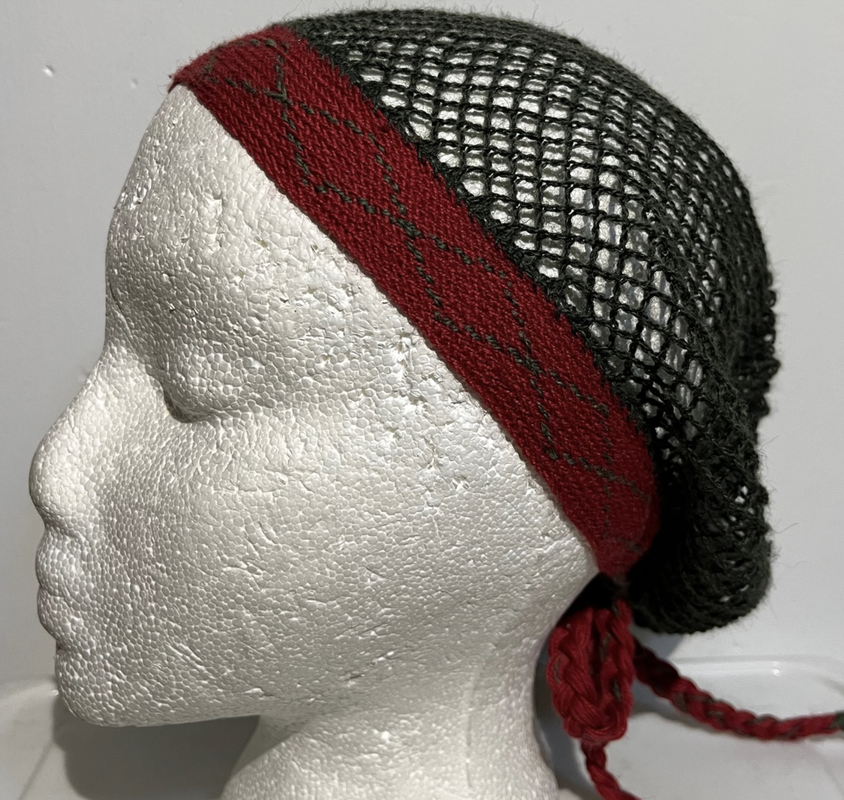
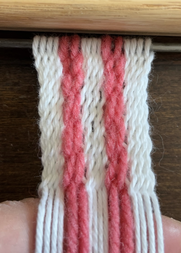
I worked a band in a 2-2 interlace stitch, with vertical ribs, and a 4 contrasting colored threads. OK, the red yarn I selected is rather close in color value to the dark green, and the green design does not stand out well on my band. I was also disappointed to note that the design in my band is far more elongated that the design in Mrs. Luther's bonnet. OK. Maybe I should stick to my field of expertise, the sprang, and leave the band to someone else. Perhaps it is another technique, perhaps an embroidered design.
PART 3 OF THE SPRANG BONNETS CONTINUES HERE
0 Comments

Sprang bonnets from the 1500's (SPRANG BONNETS PART 1)

2/1/2023

0 Comments

 
Back in 2019 I received an email from someone working for a museum in Germany. They were setting up an exhibition, trying to bring to life the outfits of a gentleman from the 1500's. The gentleman's name was Matthaus Schwarz. Apparently he was a fancy dresser, and proud of his wardrobe, as he had watercolour drawings made of his outfits, and published these in a book. 
Picture
Carol's version of the bonnet
The source book has been reprinted and  is titled The First Book of Fashion.
Doris Limmer wrote to me, asking about the bonnet that Mr Schwarz seems to be wearing.
​
Picture
from an image in the First Book of Fashion by Matthaus Schwarz
As I understand the exhibition was titled "Dressed for Success"
You can check out a virtual tour of the exhibit at ​https://kunstsammlungen-museen.augsburg.de/dressed
​
Picture
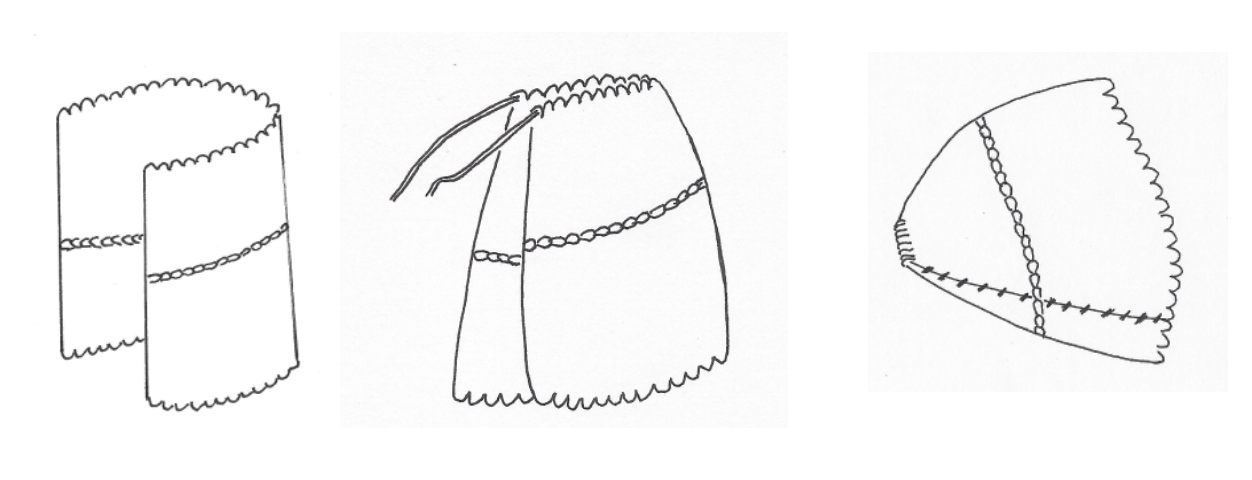
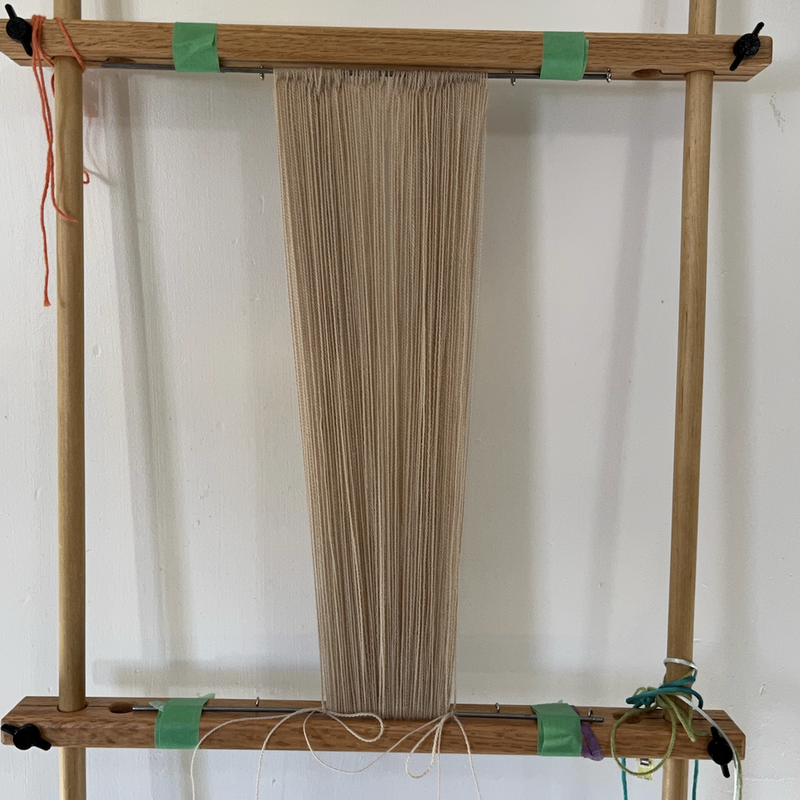
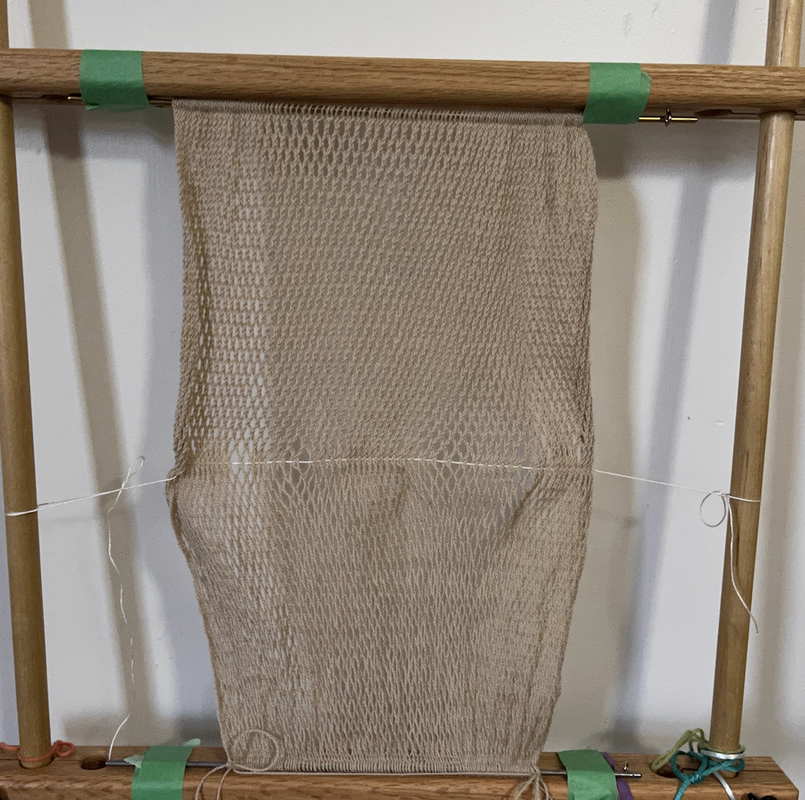
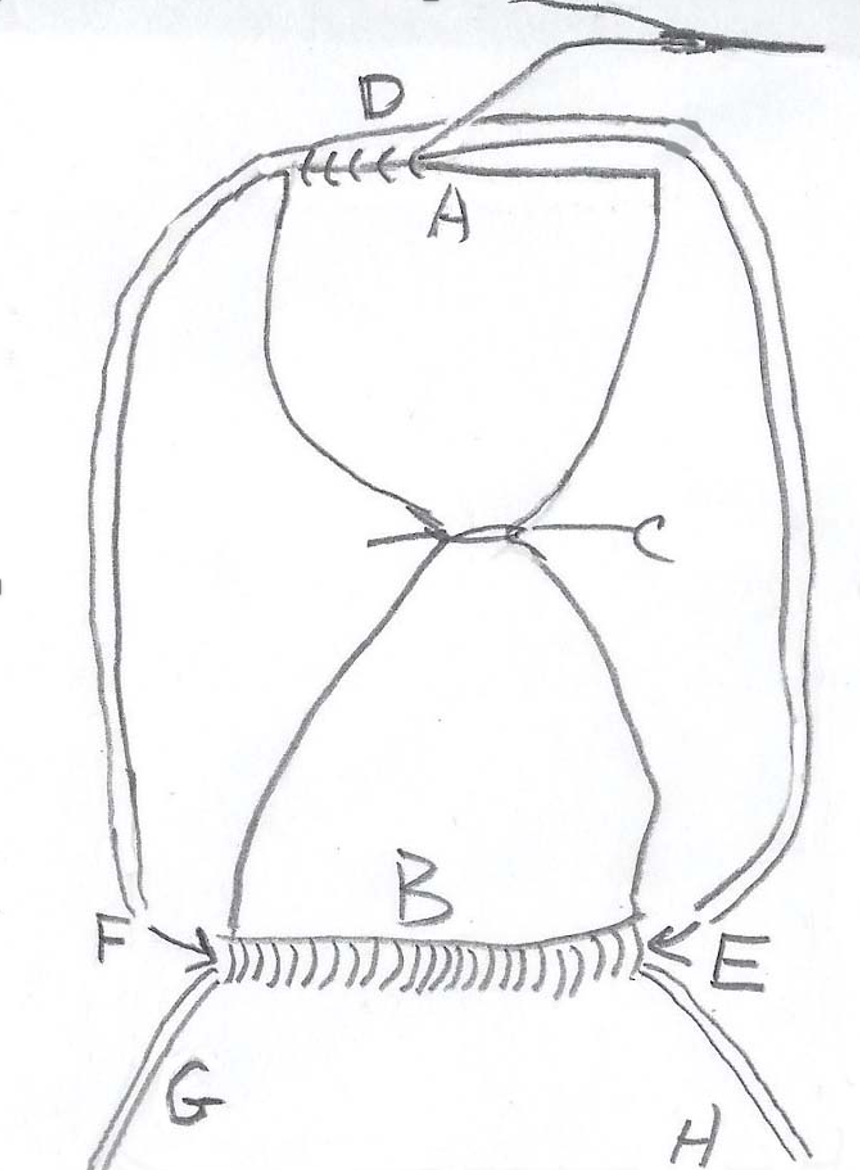
My take on this is that the fashion of the day was for a person to wear a large, wide-brimmed hat. The hat needed to sit on the side of the head. To secure the hat to the side of the head, keep it from falling off, a hairnet is worn. The large-brimmed hat can be secured to the hairnet with a pin ... that's my understanding. I have worked through a number of sprang hats, trying to replicate what I see.
You will see the scheme for my version of hat in the drawings below.
Picture

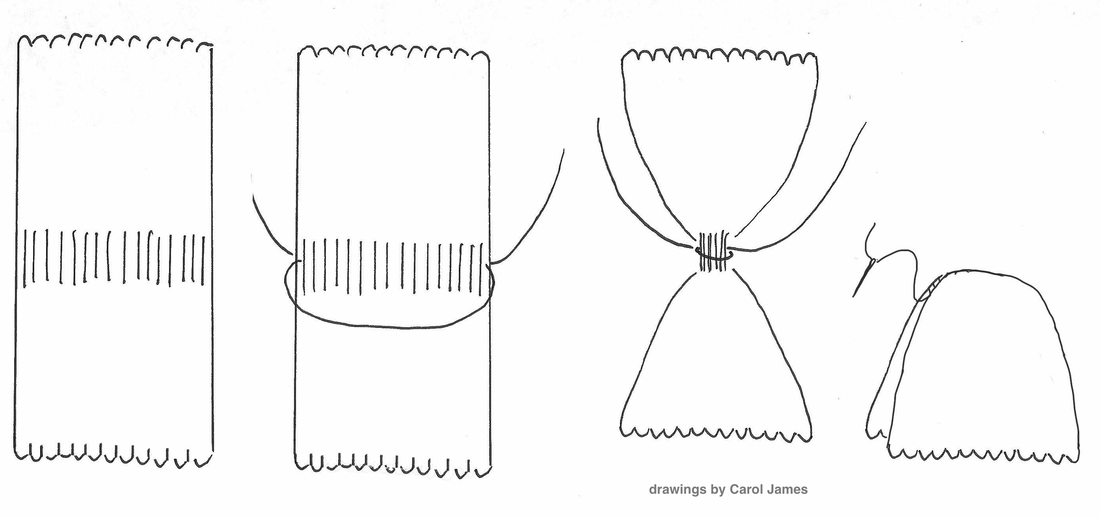
I began with a warp of sufficient length to produce a cloth that will cover the head, from forehead to the nape of the neck. The cloth must be wide enough to go half-way around the head. I worked until the two pieces of cloth met at the middle. I secured the middle with a piece of string, the same string as used for the warp. I tied a knot, and used the tails of the knot to sew up the cap. The knot sits at the top of the head (sort of) and the loops from the top and the bottom of the warp go around the rim of the bonnet.
Now that's the basic bonnet, but this bonnet seems to have a woven band around the brim. I made a band using a tape loom. For the bonnet to work according to my plan, the band needs to go around the head 3 times.

​Below you will see the scheme I followed to attach the brim.
Picture
Picture
drawing by Carol James
Picture
drawing by Carol James
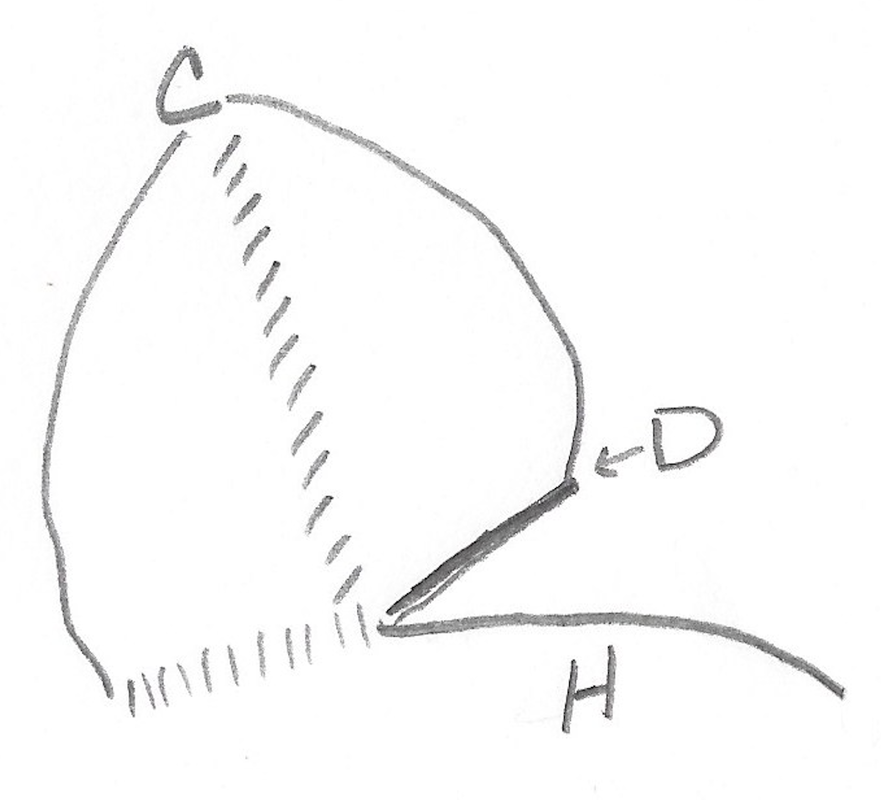
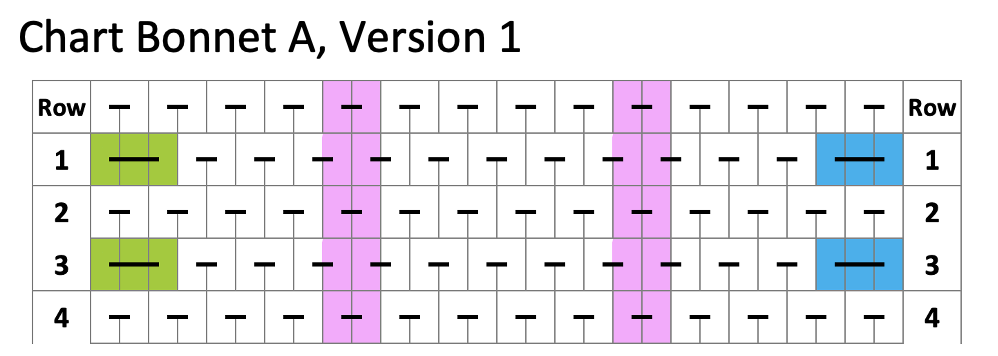
In the drawing A marks the loops that were at the top of the frame, B marks the loops from the bottom of the frame. I made sure that the loops at the bottom of the frame were loose ... you might put a stick in those loops, to keep them large and loose. C marks the centre of the cloth which comes to be located at the top of the cap. D is the band which I attached along A, the loops at the top of the frame, now the front of the cap. The ends of band D pass through those loose loops from the bottom of the frame. One end of D passes in at F and comes out as H. The other entered the loose loops at E and comes out as G. In this manner the bonnet sits, nicely spread out across the forehead, and can be cinched to fit the head. Those ends G and H can be brought around the head ... you need to make D long enough to go around the head 3 times ... and then you can tie G and H at the back of the head.
One more set of things to ponder, the colored stripes in the hat. 
Picture
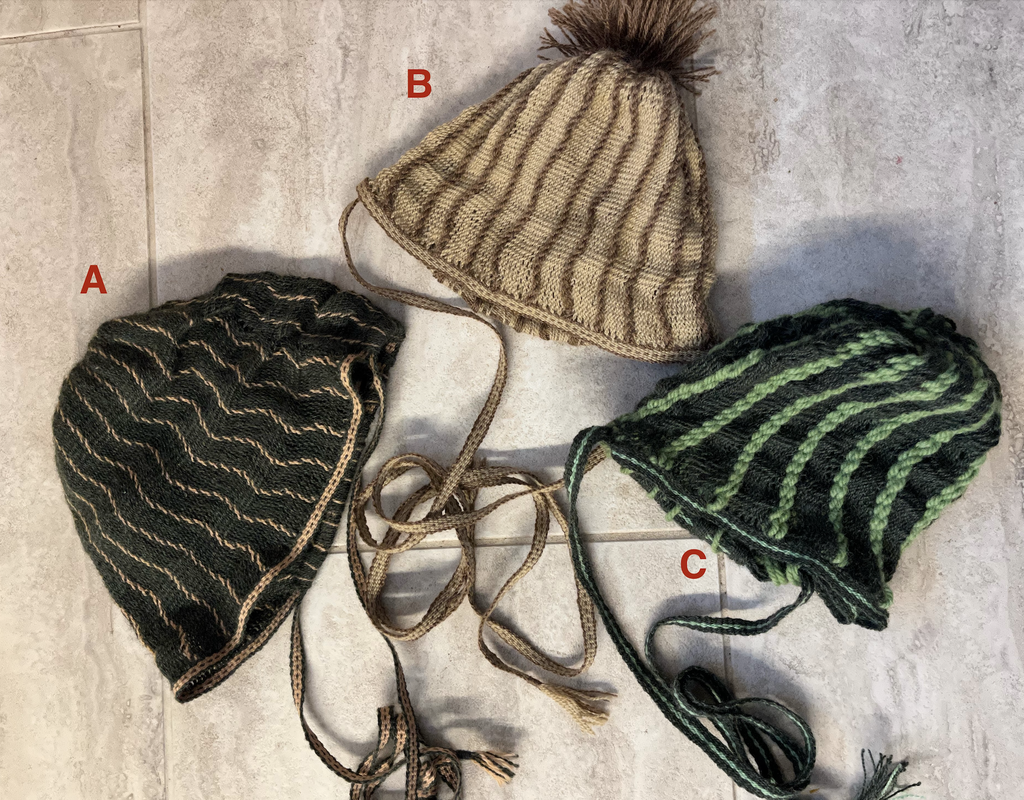
There are a couple of ways to get vertical stripes in your sprang work. For bonnet A in the image above, I used single loops of a contrasting color of thread ... that 2 threads. A single loop of the contrasting color will give you a broken line.

Picture
Picture
single loop of a contrasting colored thread
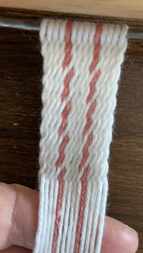
A pair of loops (4 threads) of a contrasting color will give you a solid line with a jog.
Picture
Picture

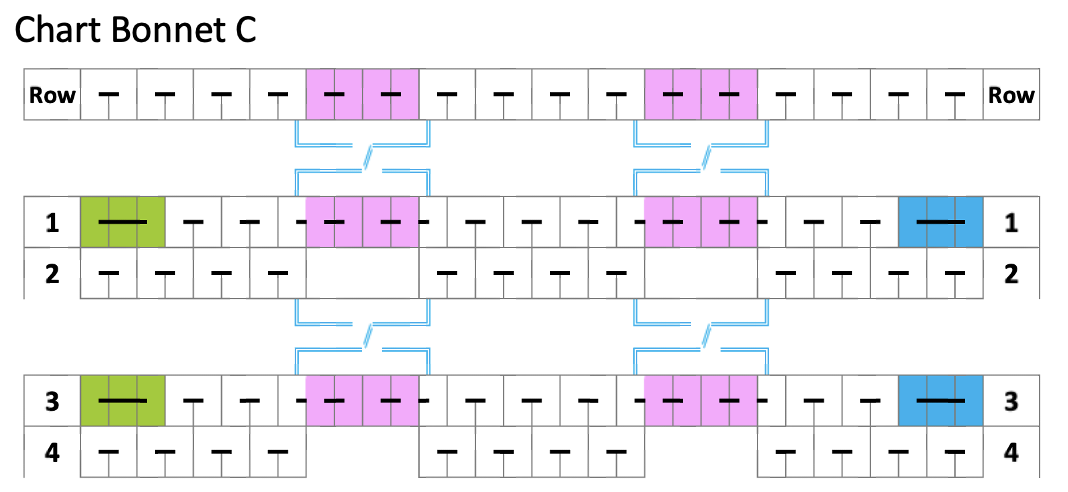
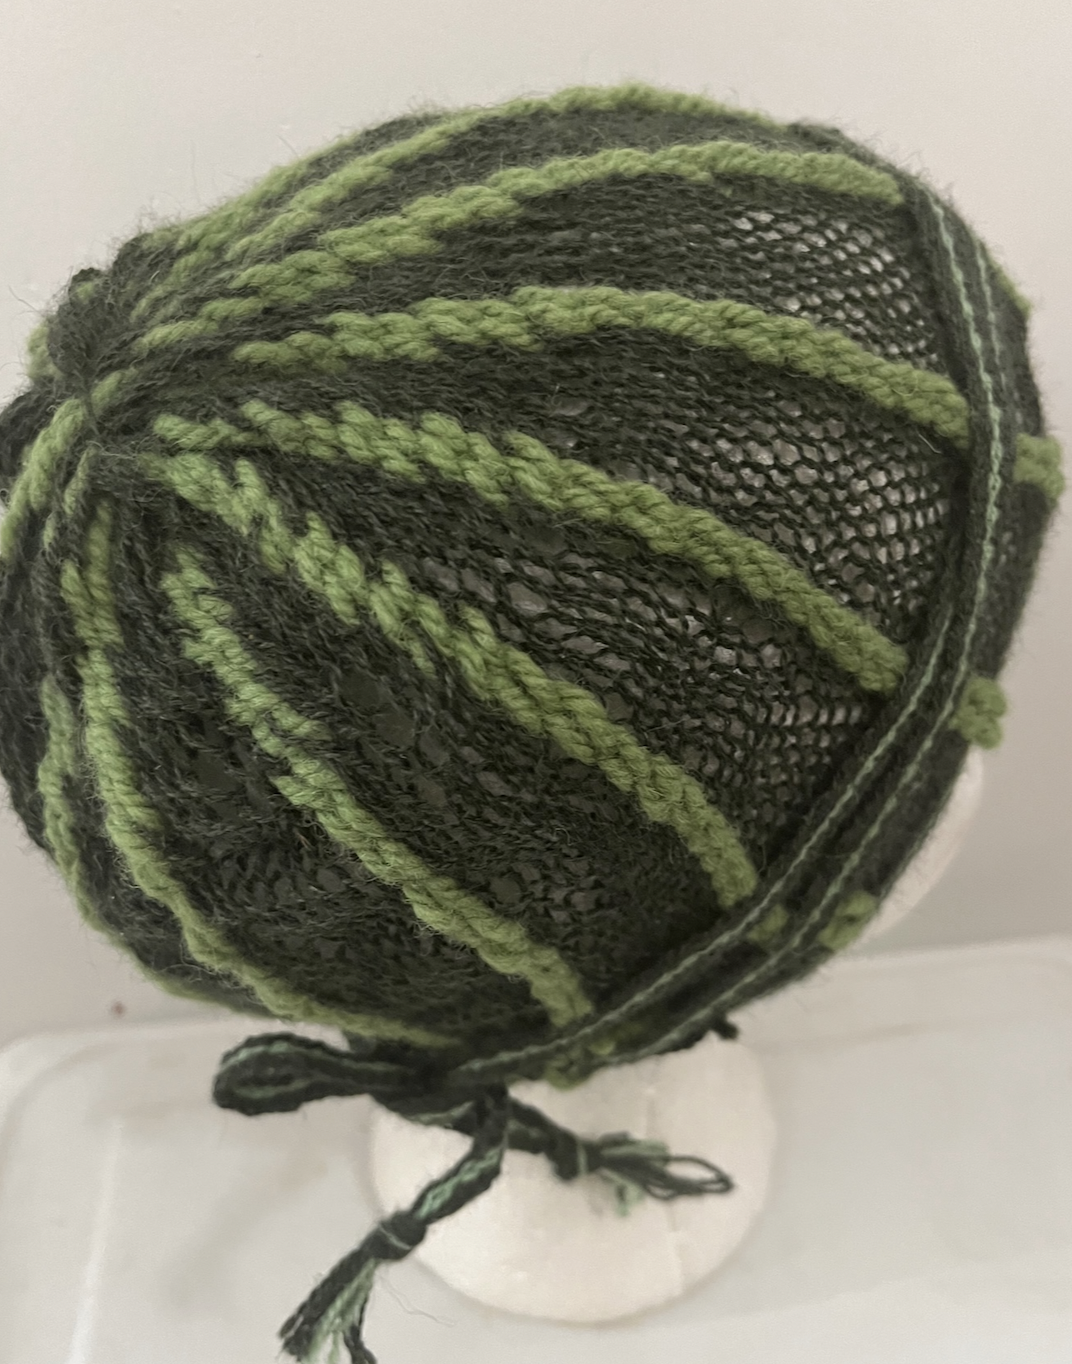
For bonnet B, I made cords of a contrasting color, and stitched them to the side of the bonnet. Actually I twisted a pair of contrasting colored threads, and then I folded the thread in half, and allowed the twisted thread halves to un-twist around each other. Where I folded the thread, that's what was attached the cord at the brim. The cut ends of the cord make for a tuft at the top of the head. Now, I don't see the tuft in the portraits ... but then again the top of the bonnet is hidden inside that large brimmed hat. I do like the idea of the thicker thread worked into the bonnet to create the stripes. This assumes that there is a reason for the stripes. The stripes being thicker would give a hat pin more bonnet to which to grip and to attach. I then thought of the idea behind bonnet C. Bonnet C features what I call vertical twining. The contrasting color threads in bonnet C always pair with same-coloured threads. There is no jog in the line. When working with vertical twining, the structure works nicely with the twined thread being thicker than the background colored threads ... perfect for this bonnet. I teach a class on sprang twining on a background of interlinking ... and this vertical twining is one of the variations covered.
Picture
vertical twining: the pink colored threads only partner with each other
Picture
vertical twining, two loops of a thicker, contrasting colored thread
Picture
It's difficult to say how these bonnets were made, particularly since I am not aware of any surviving examples. Just making a guess and sharing my take on things.
part 2 of the SPRANG BONNETs continues here
0 Comments
    Carol's blog archive

    RSS Feed

    Categories

    All
    Arizona Openwork Shirt
    Art
    Book Reviews
    Books
    Braddock Sash
    Ceinture Fleche
    Clothing
    Demonstration
    Dying
    Easily Transported Work
    Exhibit
    Exploration
    Fashion Show
    Fashion Sow
    Finger Weaving
    Inspiration
    Instruction
    Loom Weaving
    Media
    Military Sash
    Museum Replica
    Museum Visit
    No Frame Sprang
    No-frame Sprang
    Patterns
    Privite Commissinons
    Publications
    Research
    S And Z
    Sash Dance
    Sprang
    Sprang Bonnets
    Sprang Bonnets Of The 1500s
    Sprang Bonnets Of The 16th Century
    Sprang Bonnets Of The Renaissance
    Sprang Clothing
    Sprang Frame
    Sprang History
    Sprang Lace
    Sprang Leggings
    Sprang Patterns
    Sprang Twining
    Student Pieces
    Tablet Weaving
    Tips-and-tricks
    Travel
    Weaving
    Website
    Workshops

    Archives

    March 2023
    February 2023
    August 2022
    June 2022
    July 2021
    June 2021
    April 2021
    February 2021
    January 2021
    December 2020
    August 2020
    May 2020
    April 2020
    March 2020
    February 2020
    January 2020
    December 2019
    October 2019
    August 2019
    June 2019
    May 2019
    April 2019
    March 2019
    February 2019
    January 2019
    November 2018
    October 2018
    August 2018
    July 2018
    June 2018
    May 2018
    March 2018
    February 2018
    December 2017
    November 2017
    October 2017
    September 2017
    August 2017
    June 2017
    May 2017
    April 2017
    March 2017
    February 2017
    November 2016
    August 2016
    March 2016
    February 2016
    November 2015
    October 2015
    August 2015
    June 2015
    April 2015
    March 2015
    December 2014
    November 2014
    September 2014
    August 2014
    July 2014
    May 2014
    April 2014
    March 2014
    February 2014
    December 2013
    November 2013
    October 2013
    September 2013
    August 2013
    March 2013
    February 2013
    December 2012
    November 2012
    October 2012
    September 2012
    August 2012
    July 2012
    June 2012
    May 2012
    April 2012
    March 2012
    February 2012
    January 2012
    December 2011
    November 2011
    October 2011
    September 2011
    August 2011
    July 2011
    June 2011
    May 2011
    February 2011
    November 2010
    October 2010
    August 2010
    July 2010
    June 2010
    May 2010
    April 2010
    March 2010
    February 2010
    August 2009
    July 2009
    May 2009
    April 2009
    February 2009
    January 2009
    December 2008
    November 2008
    October 2008
    September 2008
    August 2008
    July 2008
    June 2008
    May 2008
    March 2008

    Categories

    All
    Arizona Openwork Shirt
    Art
    Book Reviews
    Books
    Braddock Sash
    Ceinture Fleche
    Clothing
    Demonstration
    Dying
    Easily Transported Work
    Exhibit
    Exploration
    Fashion Show
    Fashion Sow
    Finger Weaving
    Inspiration
    Instruction
    Loom Weaving
    Media
    Military Sash
    Museum Replica
    Museum Visit
    No Frame Sprang
    No-frame Sprang
    Patterns
    Privite Commissinons
    Publications
    Research
    S And Z
    Sash Dance
    Sprang
    Sprang Bonnets
    Sprang Bonnets Of The 1500s
    Sprang Bonnets Of The 16th Century
    Sprang Bonnets Of The Renaissance
    Sprang Clothing
    Sprang Frame
    Sprang History
    Sprang Lace
    Sprang Leggings
    Sprang Patterns
    Sprang Twining
    Student Pieces
    Tablet Weaving
    Tips-and-tricks
    Travel
    Weaving
    Website
    Workshops

Contact Carol

Store

FAQ

Privacy policy
Carol acknowledges that we are on Treaty 1 territory, the traditional gathering place of the Anishinaabe, Cree, Oji-Cree, Dakota and Dene people and the traditional homeland of the Métis people. Carol also acknowledges that sprang is part a meany indigenous tradition and fuond in various forms all over the world. Let us re-discover this tecking together.
© COPYRIGHT 2022. ALL RIGHTS RESERVED.
  • Home
  • About the artist
    • Gallery
  • Store
  • Sprang
  • Fingerweaving
  • Virtual Class Room
  • Contact me
  • Blog