|
This sash is certainly teaching me alot. It has been my custom in sprang to work several rows, placing sticks in each the shed, completing several rows before getting up and moving all those sheds, one after another, into the mirror-image position. This sash, as with many historic sashes from the 1700s, was created using more than one very fine thread. I’ve got multiple strands. Just like embroidery floss that comes in 6 strands, that’s how these sashes are made: multiple strands, unplied. Now the problem happens when I am not 100% accurate, and wrongly group a thread. When I go to push it into the mirror-image section, that mis-grouping causes a snag. Mostly I notice that it’s really hard pushing, check the culprit thread, and find the mistake. Sometimes, however, it’s only in examining the fresh row on the mirror image. 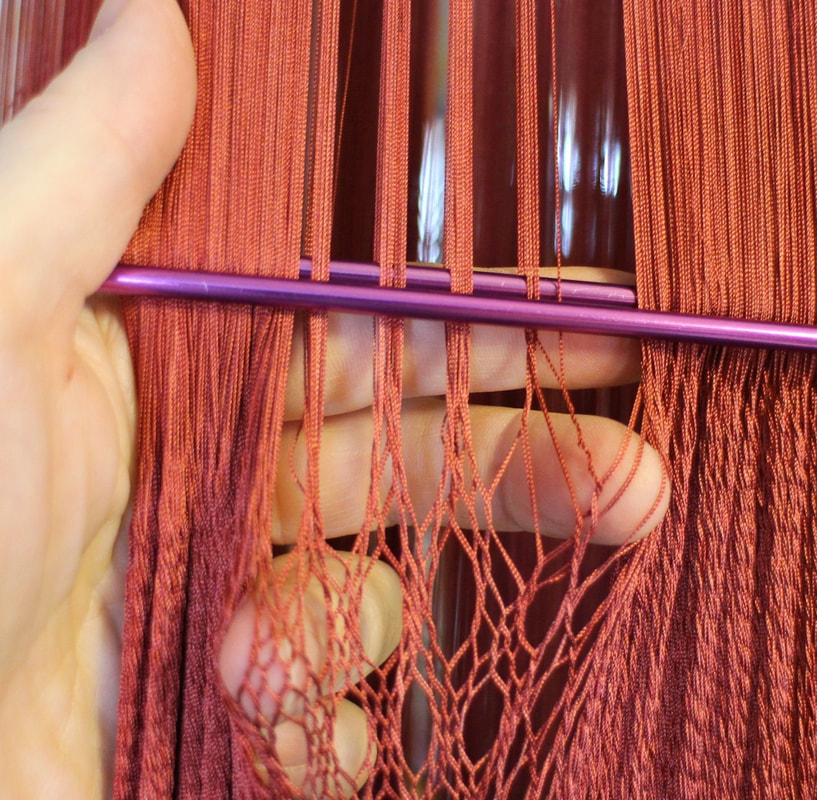 Thread grouping error The error shows up as an imperfection in the mirror image. I am finding that it’s best to catch these errors right away, like, catching it as soon as it happens. I’ve given up on this multi-row efficiency. I stand up after each row, move the row, and check. It seems the only way to assure all is well. Another issue has developed concerning thread tension. My initial warp was not 100% even, and I had to deal with that. Things have been quite smooth since …. until lately. I’ve noticed that there is another couple of threads loose lately, causing troubles. I’ve identified them as the threads at the very edge. This happens every time, indeed makes sense. The edge thread, the thread involved in that three-thread edge stitch on the plait row, makes only half the number of rotations as all the other threads. Uptake is less for this thread. I’ve resolved the issue with this thread being longer. 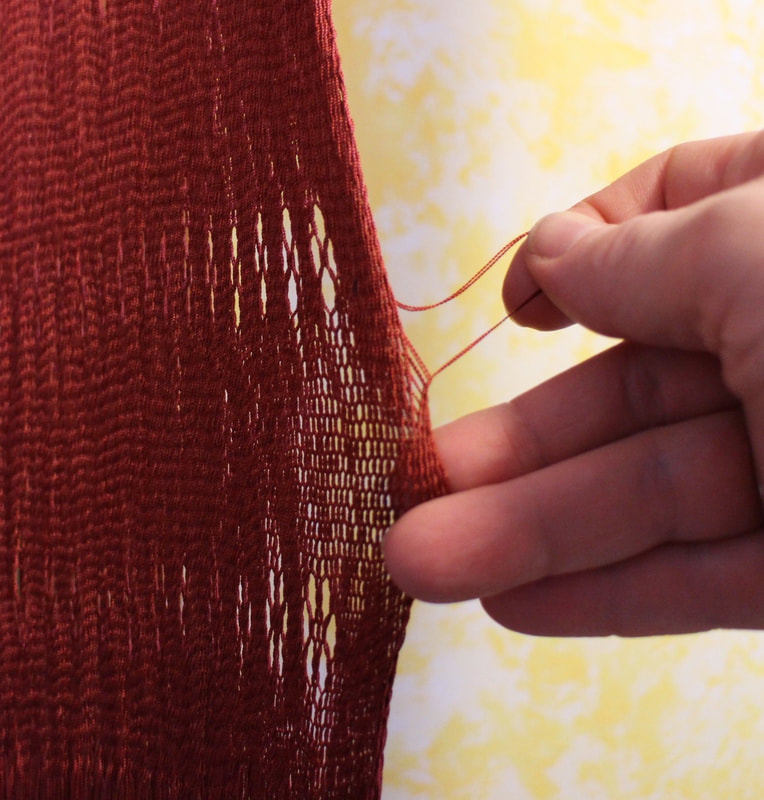 I pulled that extra thread up, leaving a loop off the edge of the cloth. I will try to remember to pull on that loop thread before the final finishing, completely erasing all evidence of this problem.
While on the subject of yarn uptake, with this very fine silk I’m noting an uptake of one inch per foot. When I work on wool sashes with a much thicker yarn, the uptake can be around 3-4 inches per foot.
0 Comments
This replica sash has some lovely designs. I am very pleased to see them working out so nicely. I have been playing with sprang designs for several years now. I find that the key to success is the effective use of pattern writing and pattern reading. Much trial-and-error has lead me to a system. Let me share a bit about my pattern writing. I have noticed that I prefer patterns that read in the same direction as the direction of work. Reading and writing English, the common standard is to work from left to right. When I work on a piece of sprang, I start at the right margin, and work towards the left. I have found I get confused when my patterns are written as normal English. I found myself happier, working more comfortably, once I started writing my pattern symbols across the page from right to left, the same direction as my direction of work. Graph paper serves me well. I use one square for each thread. In interlinked sprang the plait row begins with a ‘three-thread edge stitch’. That means three squares. The remainder of the row is stitches that involve two threads, hence two squares. The last stitch will also be a ‘three-thread edge stitch’, again three squares. A practical application? 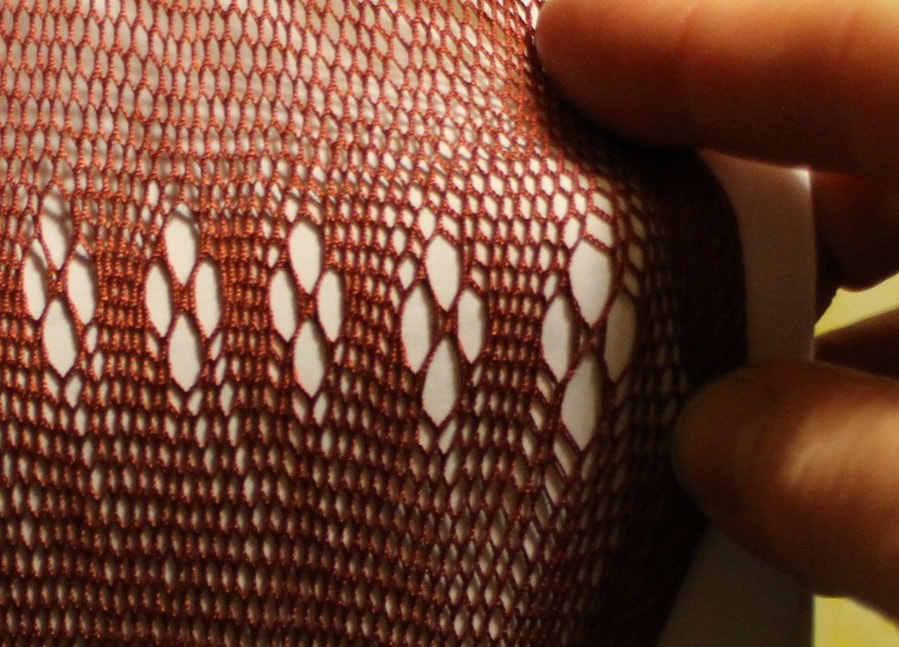 The clover pattern is a common one, and also figures in the Braddock sash. The clover pattern uses three ‘stitches’. These are the regular ‘plain stitch’ that is one up, one down, two squares on the pattern. The second ‘stitch’ is the ‘edge stitch’. This is a stitch that involves three threads, the typical stitch that begins and ends a plait row. The third stitch is what Skrowronski calls a ‘double stitch’ and Collingwood calls 2/2 interlinking. It involves four threads. It is worked in exactly the same manner as the two-thread plain stitch, except that you double the threads, two up, two down. And this is my grid pattern for the clover pattern: 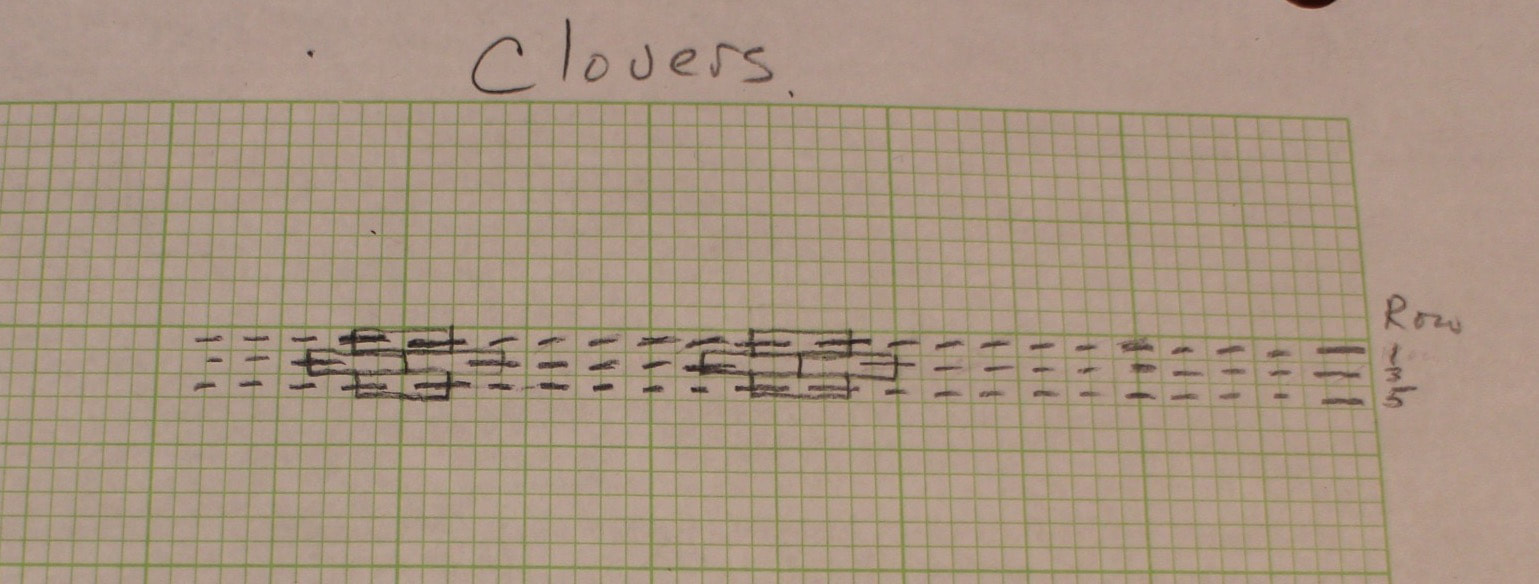  Here is a version of that same clover pattern, color coded, to try to be helpful. Right-edge stitches are blue (pick up two, put one down. Left-edge stitches are green (pick up one, put two down. Double stitches are orange (pick up two, put two down). All this to say, that I have been finding my patterns to be serving me well in this replica process.
I hope all of this is helpful to someone out there. Wednesday was the first day of spring. You can’t tell it by the look of things outside. I took a picture in my back yard. 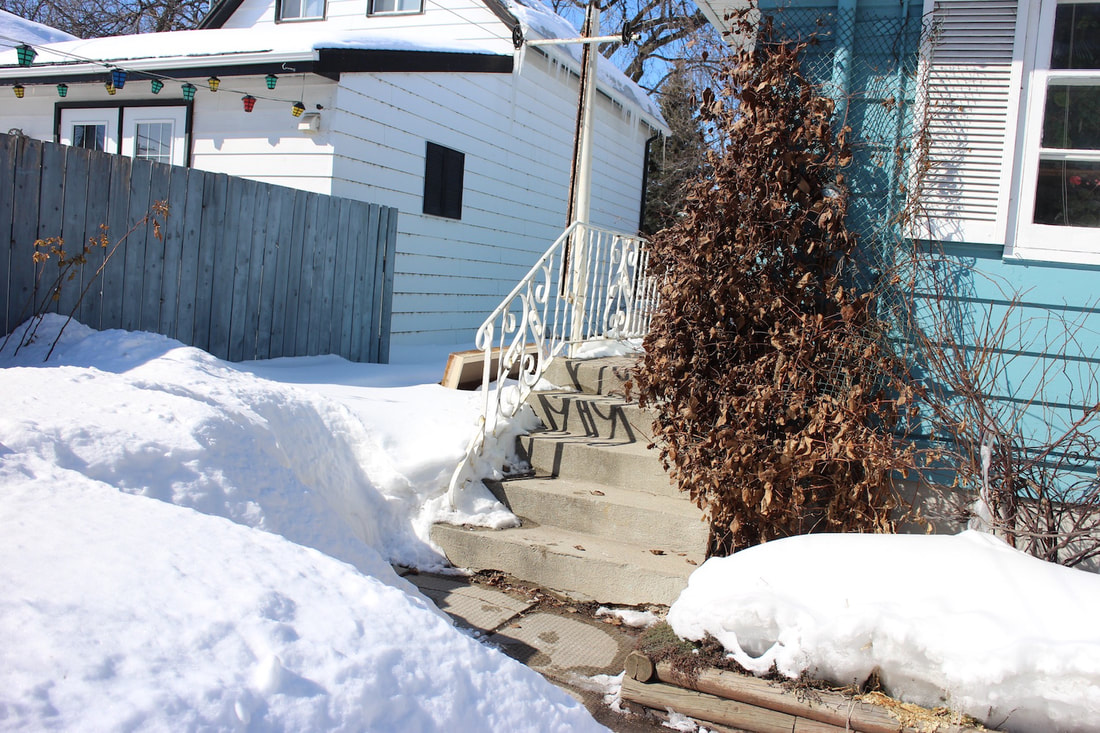 The backyard is level with that sidewalk at the foot of the stairs. Yes, the snow in my yard is up to my waist. Here’s hoping it all melts soon, but not so quickly that we have flooding.
Still working away on that sash. A small disaster yesterday. At the end of a row, I let the first part of the row slip off the other end of the needle. Lucky I have a safety line in place. Susan DuBois suggested those little rings that open up so you can place or move them easily to help keep track of stitches and patterns. Sounds like a great idea. I’m past the point where I was worried about keeping my count, fewer numbers in the repeats from here on. I’ll certainly try those rings next time. Thanks Susan for the suggestion. A while back I accepted an invitation to visit Lynn Lake, Manitoba. Check it out on Google Maps. It’s as far North as the summer roads take you. Lovely country, clean air, bright blue skies. It’s mid-March but Winter still has a firm grip. 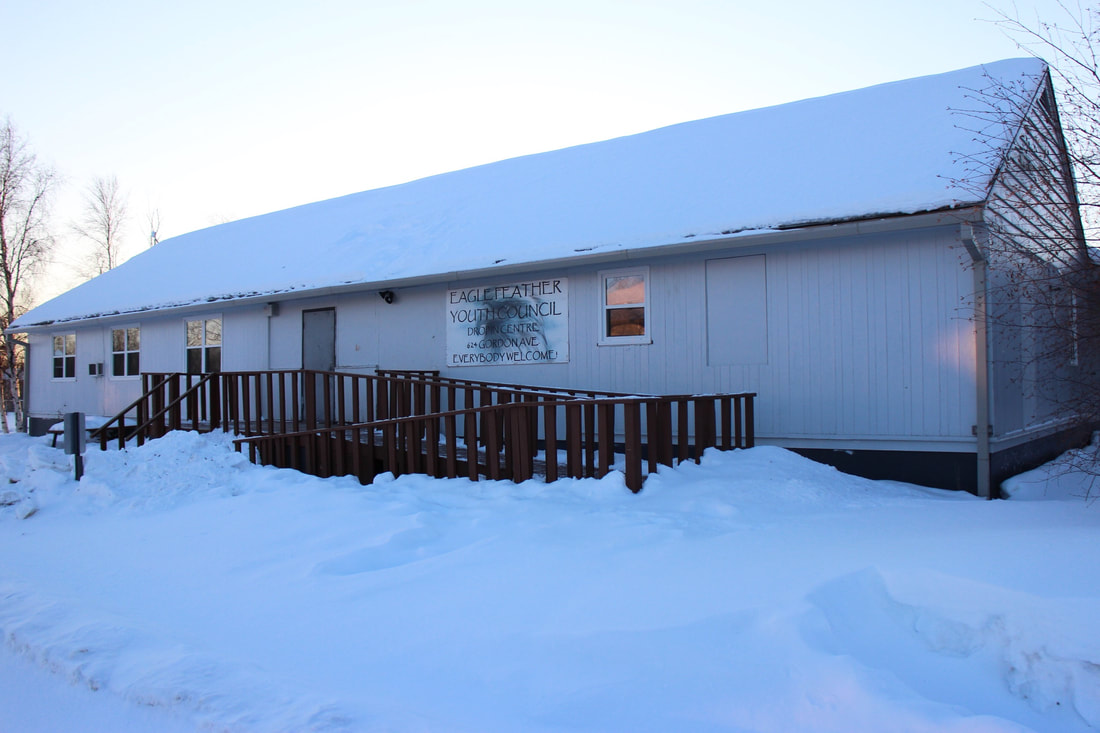 The Lynn Lake Friendship center Someone said that the wind chill today was -40.
Yes, it’s cold here, but people’s hearts are very warm. I spent the day at the local school, teaching basic braiding techniques to K-8th graders. Tomorrow I begin a 3-day workshop for the adults. This is going to be a town of weavers. I am finding that numbers are my friends. The only way to prevent mistakes is to count stitches, and re-count after every row of work. 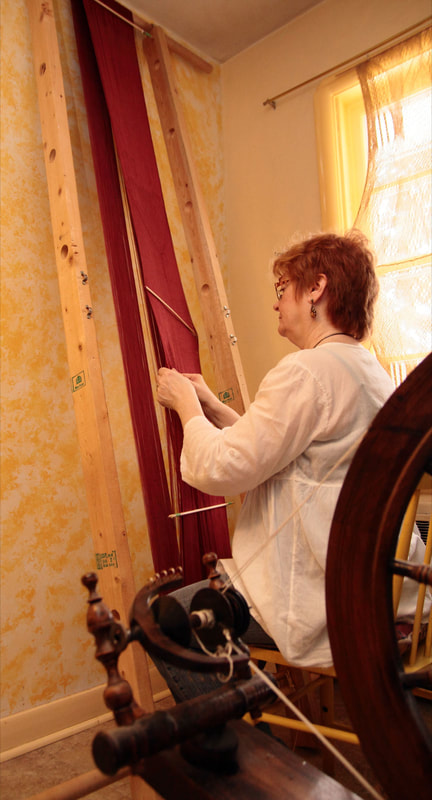 Photo by Chris Black Now, generally, when I get to working, my mind sometimes drifts. Counting more than, say, 20, I am never 100% confident that my count is Really correct. I experimented with a couple of things to help me keep track of threads. I thought about placing ‘marker beads’. This would mean sliding on the required number of beads ahead of time, sliding them along as I measured out, and leaving a bead in place at the appropriate place. The problem I anticipated was that any knot or slub on the thread would mean that the rest of the beads could not pass. I opted for placing little ‘marker threads’ every 100 threads. We re-counted at each 100, to make sure this marker was accurately placed, and to be keeping accurate account of the number of warp threads.
As soon as I began to ‘sprang’, however those markers proved impractical. They got tangled, and created tangles. So, I’m relying on counting and looking, checking each row twice. Breaking down the pattern into smaller pieces helps. Indeed, most of the patterns on this replica sash do that. And let me stress again, keeping the threads well separated goes a long way toward error-prevention, as well as making it possible to push each work around to the other side. Work on the sash replica continues. The length of cloth is now such that I’m ‘over the top’. 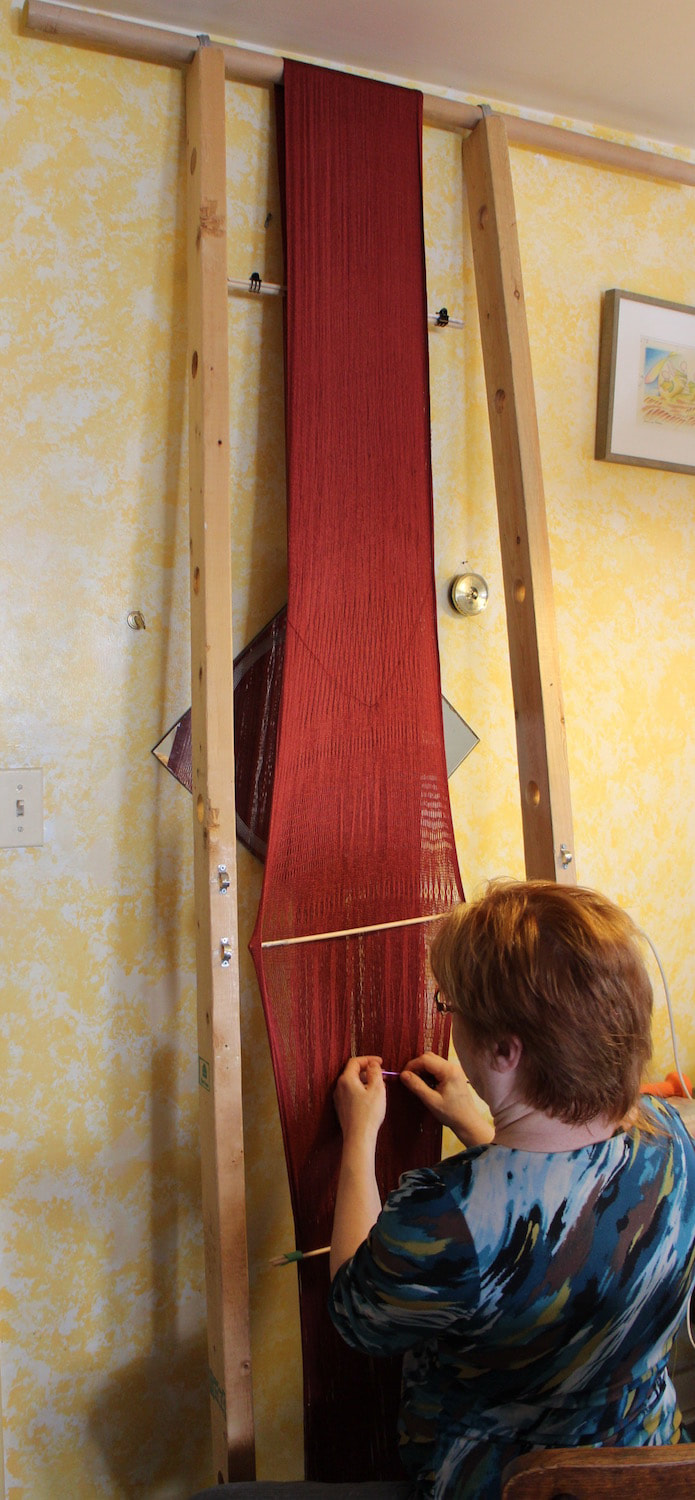 The cloth is now long enough to extend over the top. The first few feet of the sash were worked on the ‘front’ of the frame. Each time I worked a row, the new shed was pushed down, around the bottom, up the back of the frame, and finally over the top. Each time a ‘Z’ row was completed, an ‘S’ row was added above.
I’ve arrived at the point where I now sit and work with the ‘Z’ row at a comfortable height and the most recent ‘S’ row is on the ‘back’ side of the frame. The ‘S’ portion seems to need a bit of encouragement to compact together. Early on I found that a heavy knitting needle in the last row, clasped to another needle for security, was the right thing to press each row against the previous. It also served as ‘safety’ line, should (horror of horror) I loose my working shed. Now that I’m over the top, the heavy knitting needle works at cross purposes. A few rows past the top of the frame, I noted that the needles were weighting downward and away from the cloth. At this point I switched to wooden sticks. The sticks are lighter than the metal knitting needles and not particularly well finished, so they ‘grab’ to the threads in the last shed, don’t fall down. Progress is slow, but steady on the sprang sash. Here is where I am. The date is now on the sash. 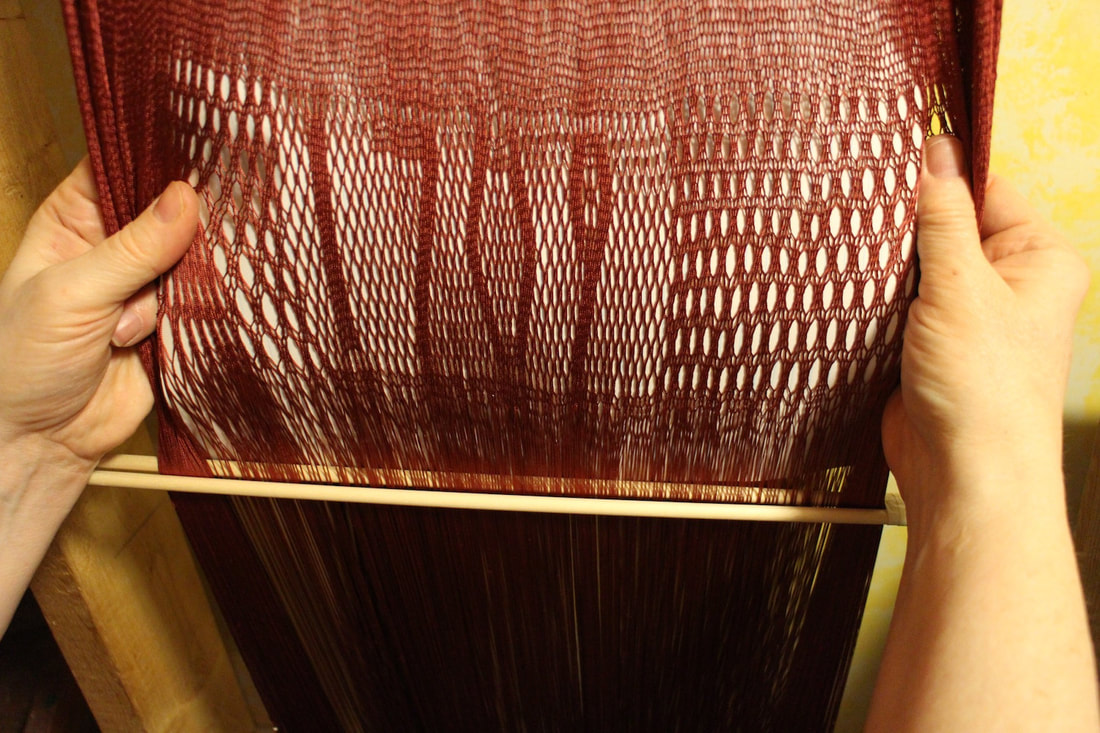 General Braddock’s father graduated from military academy in 1709. A reporter for the local French language newspaper stopped by to interview me. Her camera is also a video camera. She shot a short youtube video. For those who do not speak French, I explain the basic idea of sprang, two rows of cloth for every one row of work. The video then shows you a close up of the sash, and then how I move a row of work around. The sash grows from a central line outward towards the fringes. Tension in sprang is always a question. How tight should I keep my warp? Too tight and it is hard to get your hands in there to work, and strings break. Too loose and it becomes impossible to move the row just worked to the mirror image portion of the cloth. I am finding that tension also plays a role in the ‘rows per inch’ of the finished cloth. Oddly enough, a very tight tension prevents a tightly packed cloth. High tension will ‘loosen’ the cloth as you weave the next row.
Preparation work for this massive replica project included the creation of samples, using the threads that seemed right for the project. Those samples were narrower and much shorter than the finished product. Finishing the samples, and comparing them to measurements of the original sash I was concerned. The number of rows per inch was much higher in the samples than in the larger sash. Now that I am working with a 15 ft warp, I find that high tension is mandatory. It is my only hope for keeping the threads in order, and pushing the work around to the mirror-image side. Interestingly, without working at it, the number of rows-per-inch seems to be coming out just exactly right. The amount of tension required to manage such a long warp is exactly the amount of tension to give me the right rows-per-inch. It’s looser than my sample pieces, but correct for my measurements. Go figure! |
Categories
All
Archives
May 2023
Categories
All
|
 RSS Feed